
OpenStreetMap Server Self Hosted Setup Guide HowTo.

So I wanted to do a quick write up on this really cool self-hosted open source map tile server. When your done, you will prefer it over google maps! Let's be clear, this is a very powerful platform, and you can import just about any type of data, maps and layers. I built one quick for a customer who needed detailed maps, full editing capabilities, and a hydrology layer added.
I am going to be showing you how to install on Linux using docker, and then importing a few major PBF data files, a large file that gets processed and imports all kinds of excellent data into the postgresql database. This will give full search capabilities for address, places of interest and many other data points!
On to the Install.....
So you will need a VM created, I used Ubuntu server 22.04LTS, and installed docker.io and docker-compose. Perform all updates, reboot and we can start!
If you do not have Git installed, install it quickly with "apt install git".
Clone the Repo
git clone https://github.com/openstreetmap/openstreetmap-website.gitChange to Directory
cd openstreetmap-websiteInitial Setup Storage and Database
cp config/example.storage.yml config/storage.ymlcp config/docker.database.yml config/database.ymlPrepare local settings file
touch config/settings.local.ymlNOTE: The last part is a little confusing, but apparently is needed for the install to work properly. The actual settings file we will be editing during this tutorial is settings.yml.
We are going to use stock default settings to finish initial install, then go back and modify the settings.yml file for the correct server name, Oauth app setup for Edit functionality, SMTP server settings etc.
Ok so now lets get the project up
docker-compose buildThis might take a little, it will build the project, then lets run it
docker-compose up -dWhen the containers come up, we need to run some initial commands to migrate, prepare and test the database.
Run the Rails database migrations:
docker-compose run --rm web bundle exec rails db:migrateTest it
docker-compose run --rm web bundle exec rails db:test:prepareRun the test suite
docker-compose run --rm web bundle exec rails test:allIf you encounter errors about missing assets, precompile the assets:
docker compose run --rm web bundle exec rake assets:precompile
At this point you can log into the server at your IP address http://ipaddress:3000, we are doing this without https or SSL, but a simple reverse proxy config and SSL cert could be placed in front of this easily enough.
At this point, you have anonymous public access, but to register a user, which is required for editing and note/markup with full functionality, we will have to edit the settings.yml file, but first lets get some data into the project!
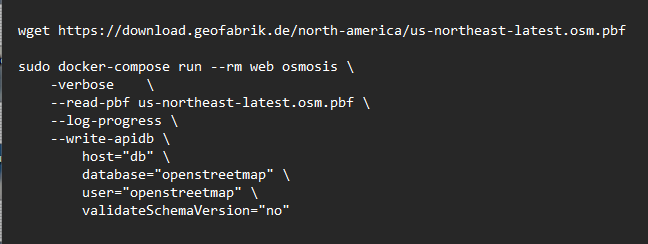
Easiest thing to do is go to Geograbrik's website at the link below, and download the region file for your area, you can do this right in the home project directory. Get the link of the region download file by copying link from website, then use wget to download it.
In my case, I am using the US-northeast file, if you have the space, and ALOT of it, you can do the entire planet if you want. I recommend you have SSD storage and a VM with at least 500GB to start. As in this case for example, the 6GB northeast file, once imported and processed by osmosis will use close to 250GB of that 500GB space when complete. This process is what puts incredible detail into your OpenStreetMap server.
Download regional PBF and Import
This is going to take a WHILE, even with decent hardware.
Customizing Install
We first need to modify the settings.yml file for a few items so we can successfully register a user, which is needed to then create an Oauth app.
Navigate to the config subfolder of the project working directory.

Now lets modify the settings.yml file.
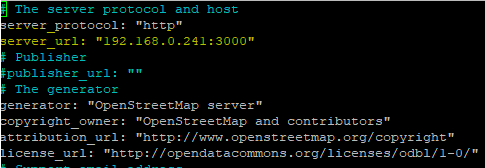
First we want to modify the server_url to be that of your IP:3000, or the email sent out will have incorrect verification link even though its local.
Default Value is "server_url: "openstreemap.example.com", change it to show something like I did, example below.
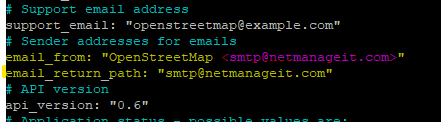
Now lets do the email setup part, note if you are using 365, you need to make sure the email_return_path variable is set to the exact email address your SMTP auth'in from.
Default is:
#Sender addresses for emails
email_from: "OpenStreetMap openstreetmap@example.com"
email_return_path: "openstreetmap@example.com"
See my example of changes
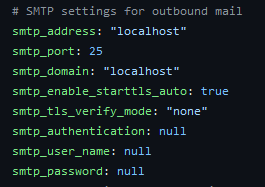
Next, scroll down to the bottom of the settings.yml file to find the SMTP auth variables. First screenshot is the default, which isn't helpful, as the syntax has to be perfect.
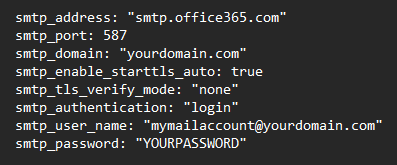
For this example I am going to use a FAKE account template for security purposes, but you will be able to see the syntax for 365 SMTP and other secure email hosts you need to use.
Now save your modified settings.yml file.
Now go back to root of project folder /openstreepmap-website
Issue the following commands to stop and restart docker for changes to be applied.
docker-compose stop
docker-compose start
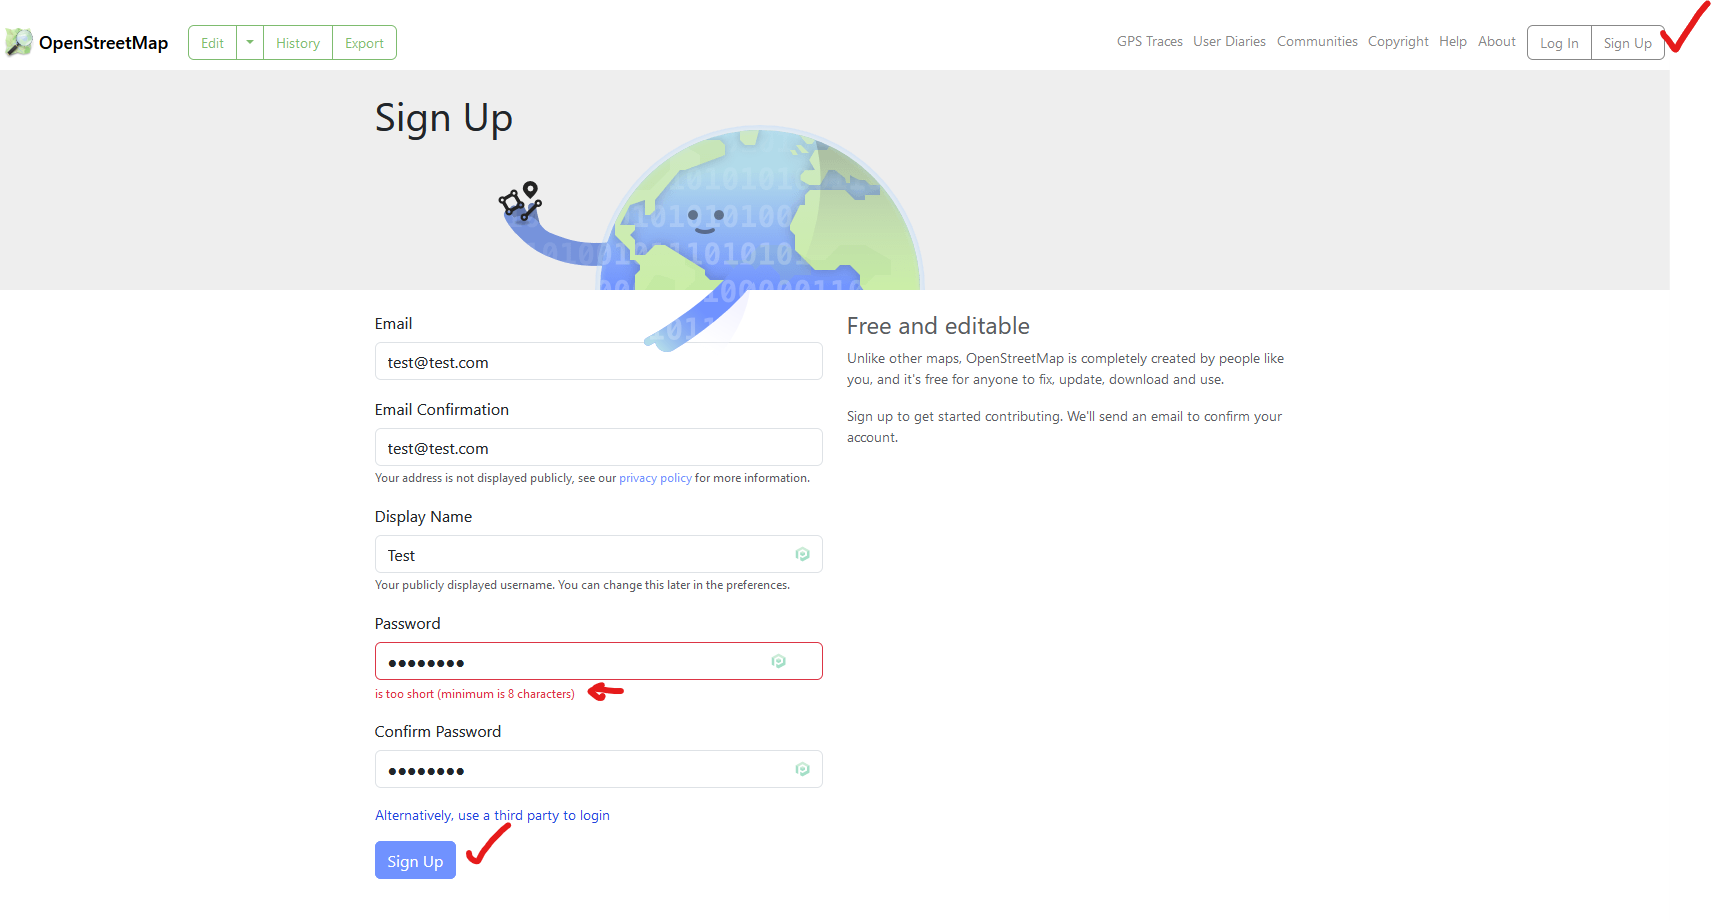
One it is back up, go to http://yourip:3000 and click on "sign up" upper right.
Fill out your email, a password you want to access the site with, and proceed.
Now Proceed to accept the terms screen by clicking "sign up"
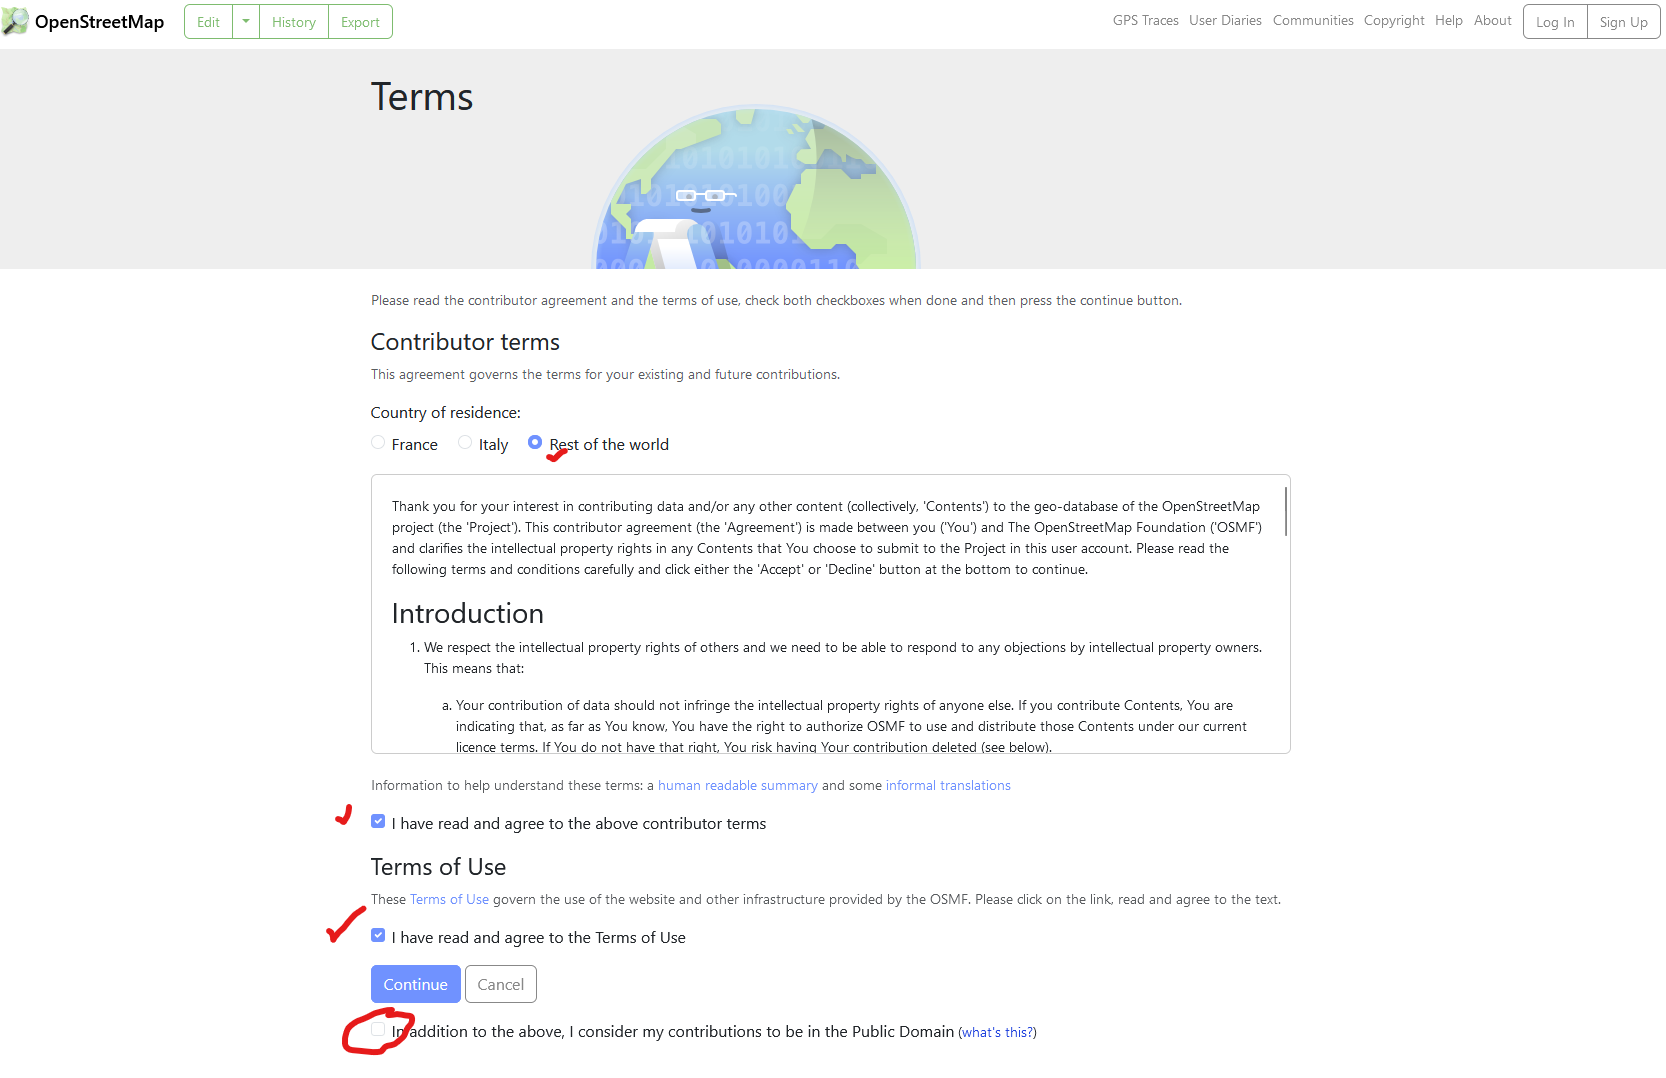
Now if your SMTP settings are correct, you will see an email with a verification link, go ahead and click on that to verify.
Setting up Oauth App for iD editor functionality
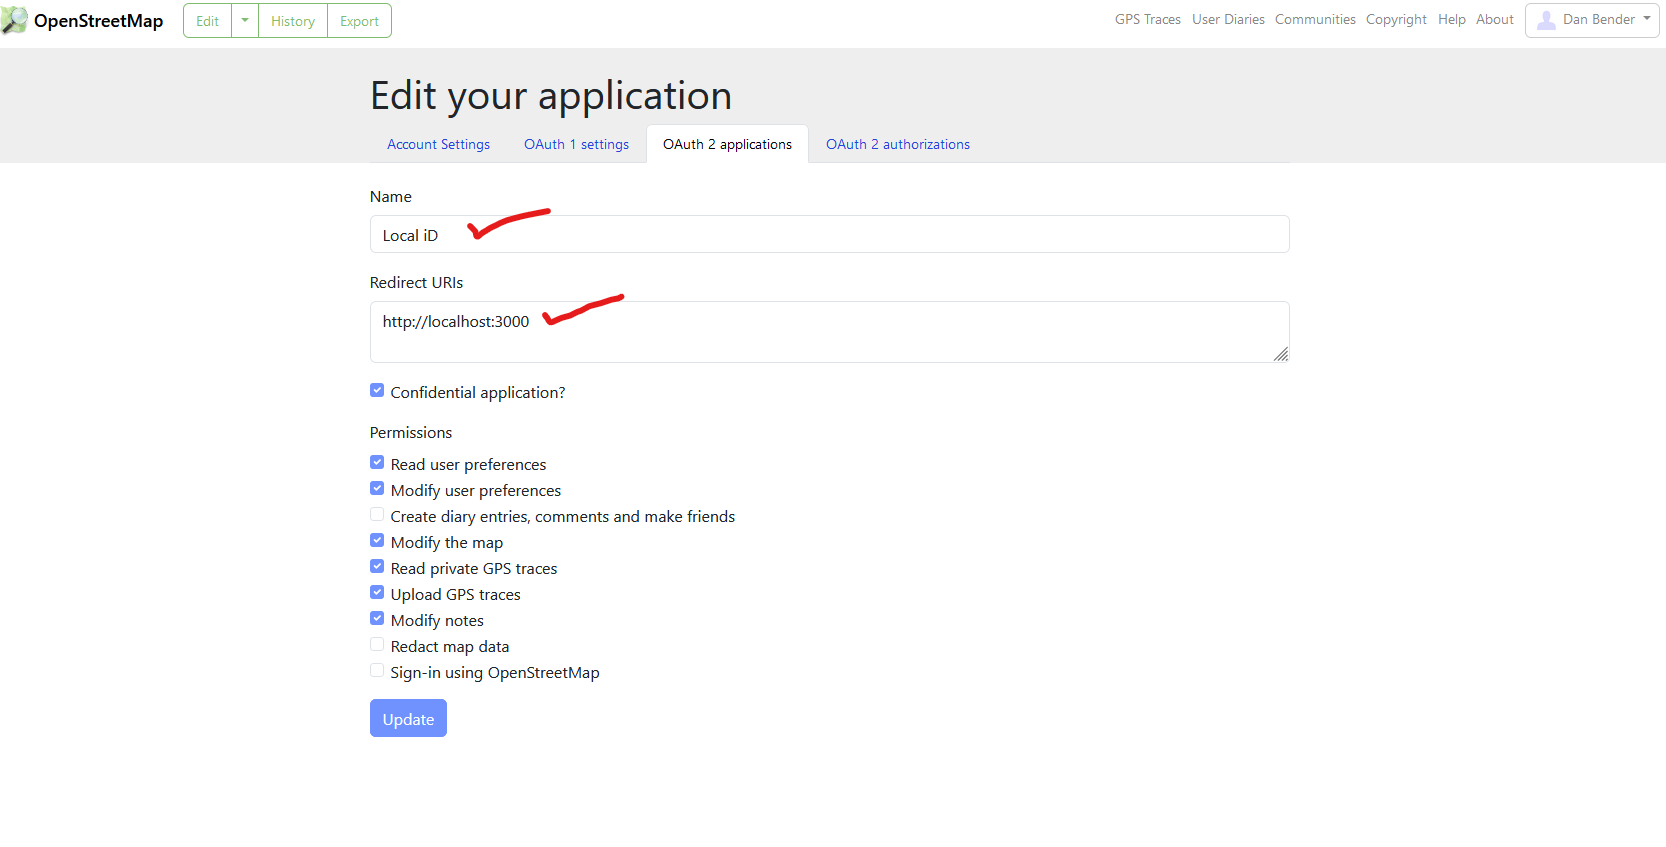
- Go to "OAuth 2 applications" on the My settings page.
- Click on "Register new application".
- Unless you have set up alternatives, use Name: "Local iD" and Redirect URIs: "http://localhost:3000"
- Check boxes for the following Permissions
- 'Read user preferences'
- 'Modify user preferences'
- 'Modify the map'
- 'Read private GPS traces'
- 'Upload GPS traces'
- 'Modify notes'
- On the next page, copy the "Client ID"
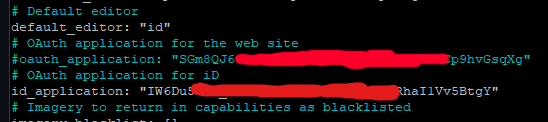
- Edit config/settings.yml in your rails tree /config/settings.yml
- Add the "id_application" configuration with the "Client ID" as the value
- Restart your rails server
Here is my Application settings example view in Web interface.
NOTE IMPORTANT: Make sure you use "Local iD" for name, and Redirect URI needs to be "http://localhost:3000"
And this is an example of what my settings.yml file looks like.
Now save the settings.yml file, and lets restart docker containers for changes to take effect.
docker-compose stop and start
Now when you go into the Web UI, signed in, and zoom in to an area, you can click edit and the iD editor will work.
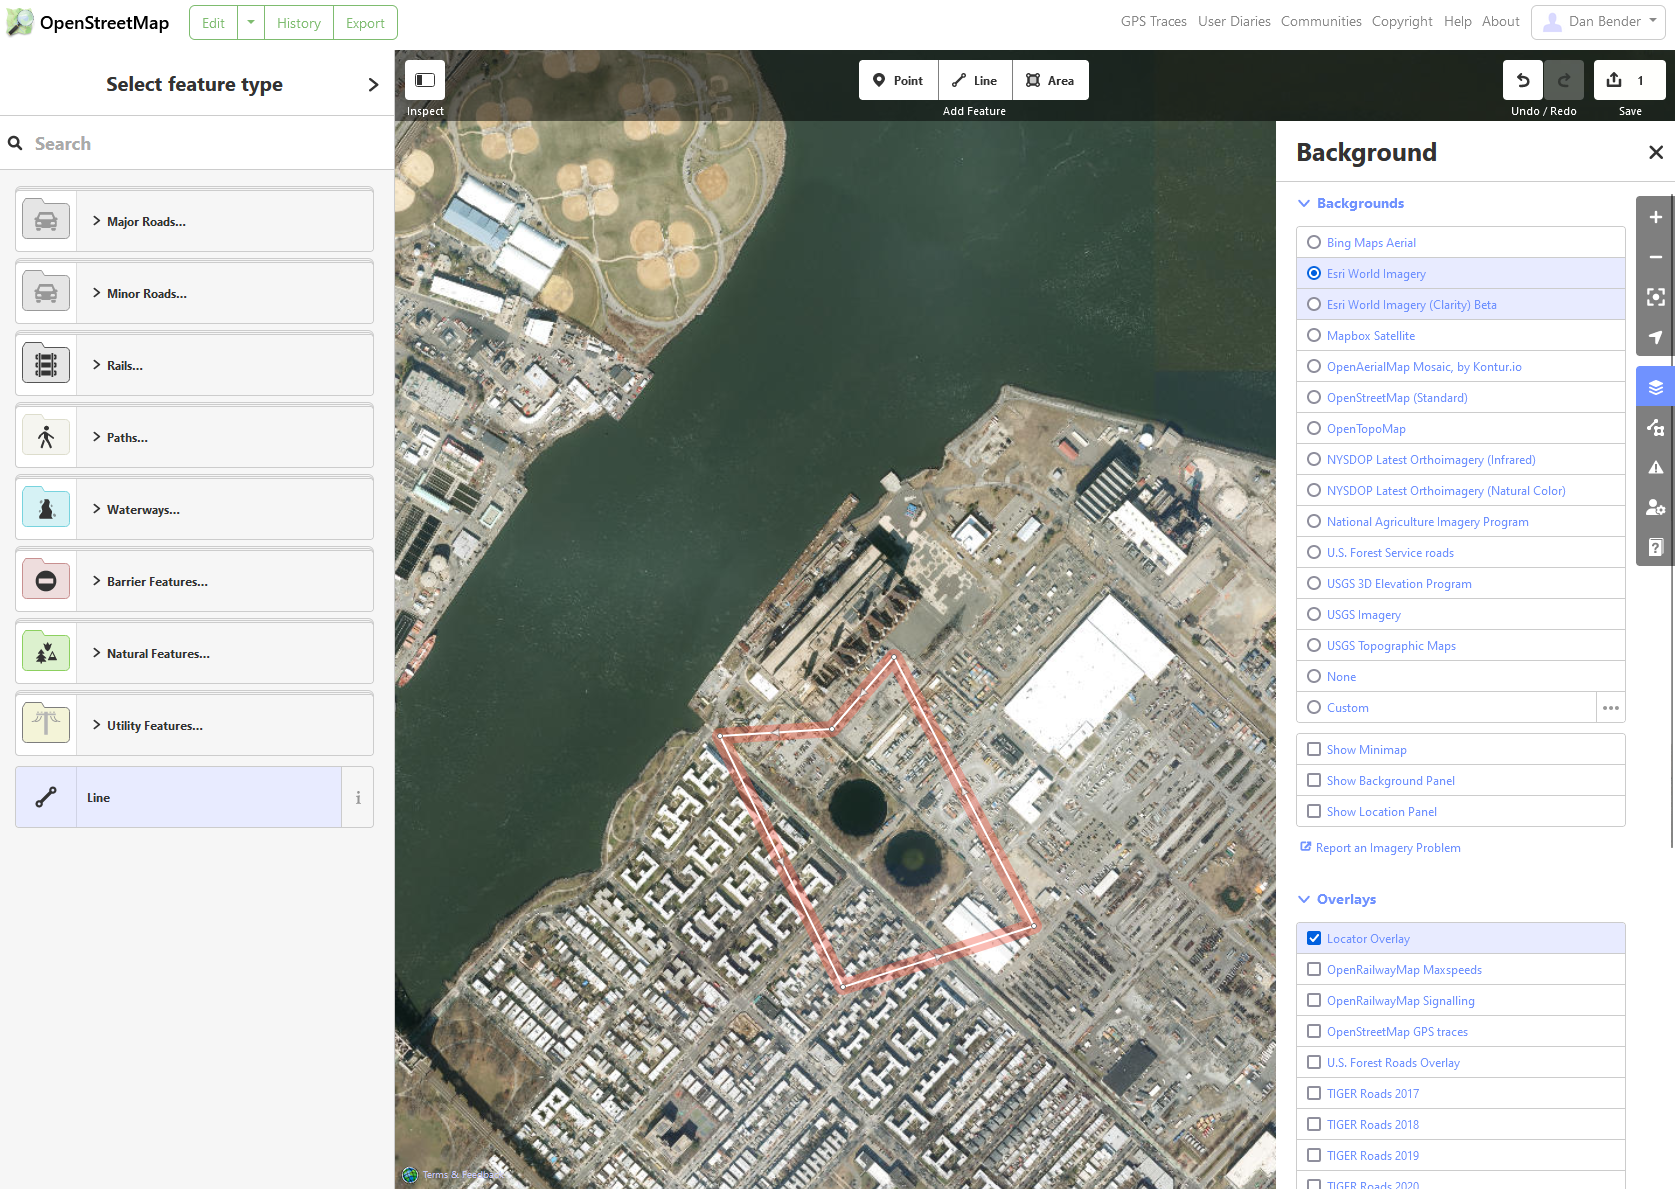
That is it! You now have a fully functional, self-hosted, fast Map server, with a ton of data and features!
Enjoy!
Dan