
OpenCTI Install HowTo setup full installation self hosted.

Big Update!
I quickly created a fully turnkey ready to go VirtualBox VM OVA, with OS, Docker and OpenCTI configured and installed! This will get you on your way with your own up to date OpenCTI instance with the most popular connectors!
The VM is loaded with Ubuntu 24.04LTS Desktop an the newest version of Docker and Docker Compose installed. OpenCTI 6.6.5 setup and running automatically, with all containers set to restart always. Once booted up, it will start to pull down more data soon as it is launched.
The username and password for the root user of Ubuntu are both "opencti". The login creds for the OpenCTI admin, is "opencti@netmanageit.com" and the password "netmanageit". The VM is set to use a bridged adapter and DHCP. To find your IP address, pop a shell and do an "ip a" command. Then visit the OpenCTI main login portal screen @ http://YOUR-IP:8080 .
For more details and instructions for modification and changes, go to the instructions .txt file on the desktop for more information.
Click below to download the OVA file fast from one of our fast servers, Enjoy!
OpenCTI Public instance now live for learning and research, check it out! Read only credentials on the landing page. https://opencti.netmanageit.com
UPDATE 04/25/2025: Docker-Compose Updated to 6.6.8 OpenCTI, Redis 7.4.3 and Elastic 8.18.0.
RELEASE NOTES
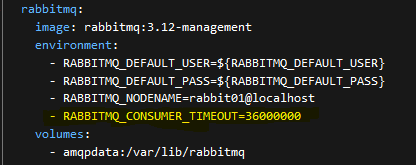
If you are seeing Connectors stall, Bundle number reaching a point then freezing. Or errors in the RabbitMQ console logs about RED colored AMQP "close connections" errors cycling back and forth. This custom mod is for you! This is nowhere to be found in the OpenCTI configs or documentation. After some tuning and monitoring and finding a few needles in the haystack. This one entry can greatly speed up the purging of "orphaned" Rabbit connections, releasing the log jam, and greatly increasing the ingestion speed and responsiveness of OpenCTI.
Docker-Compose example updated, but for your reference see below. Yellow entry is new.
UPDATE 12/6/2023: Put the following code in the docker-compose example file to help with Redis Memory errors. Testing on Public server shows it helps regardless of resource allocation. Should help smaller resource VM's especially.
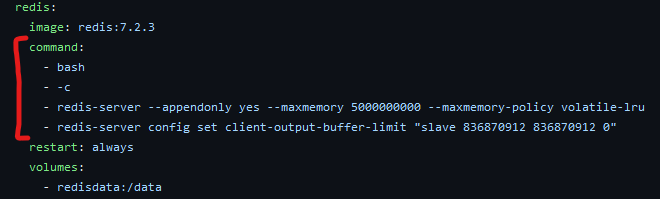
command:
- bash
- -c
- redis-server --appendonly yes --maxmemory 5000000000 --maxmemory-policy volatile-lru
- redis-server config set client-output-buffer-limit "slave 836870912 836870912 0"
RSS Feature Notes: Feed examples below for fairly new RSS functionality added recently:
Here are 4 great RSS feed URLS to get you going. If anybody has an interest for me to add a RSS ingestion setup section, please let me know. It is fairly self explanatory. It is under "Data", "Ingestion", "RSS Feeds".
https://feeds.feedburner.com/TheHackersNews
https://krebsonsecurity.com/feed/
http://feeds.feedburner.com/NakedSecurity
UPDATE 3/15/2023 : Part2 Optional SSL setup with Nginx Reverse Proxy using Certbot and LetsEncrypt setup added to end of article.
Start of Original Article:
The OpenCTI project (Open Cyber Threat Intelligence) is a platform meant for processing and sharing knowledge for cyber threat intelligence purposes. It has been developed by the French national cybersecurity agency (ANSSI) along with the CERT-EU (Computer Emergency Response Team of the European Union). It was initially designed to develop and facilitate ANSSI’s interactions with its partners. Today, the platform has been fully released in open source and made available to the entire cyber threat intelligence community, in order to allow the actors to structure, store, organize, visualize and share their knowledge."
IMO it is the best Self-Hosted Open Source Threat Intelligence platform out there. It takes regularly updated lists/feeds of Threat Intel, ingests them, analyzes and enriches the data, and provides you with your own living breathing continually updated database from multiple connectors via API. In this tutorial I am going to try and make an install guide for those who might be intimidated or struggle with the idea of installing and configuring such a powerful Linux based platform. Even if you are successful in spinning up an OpenCTI instance, or get past the Linux commands to initially get going. I am finding most people seem to struggle understanding and configuring the connectors portion of the installation. Without the connectors feeding data, you will be met with an empty OpenCTI instance. Later in this article, I will provide links to a pre-configured Docker-Compose file with everything ready to go with a few of the major connectors pre-configured. All you will need to do is go to the sites and register for your free API keys.
That being said, lets start with that. Before we get started, go to the following websites below, and sign up for the free plans of these services, so you can get your API keys. This will be needed to copy and paste into the Docker-Compose file I will provide later on.
The sites to register in this example are:
otx.alienvault.com, abuseipdb.com, intezer.com, shodan.io, urlscan.io and ipinfo.io
There are other connectors I configured, but these do not need API keys. If you chose to opt out of the specific connector, you will want to delete that section in the docker-compose.yml file. This will be between the "connector-CONNECTORNAME:" top line and bottom line that ends with "depends_on: - opencti", delete or comment out the lines for that particular connector.
Now to get started
In this example, we are going to be using Ubuntu 22.04 LTS Server. I would advise not going with any 20.04 version of Linux with the current OpenCTI Version 5.5.2+ going forward as it seems to be problematic. You can head over to https://ubuntu.com/download/server to download the ISO image of 22.04 LTS. I prefer in this case to use the server version, and not desktop version, but either will work.
NOTE: OpenCTI has multiple docker containers with a variety of software that all work together to make the magic happen. It takes a bit of Horsepower to run. So I would recommend a VM with 4 vcpu and 16GB of memory and 150-200GB disk space at a bare min! Even then, I cannot guarantee there won't be problems. You are likely to see out of memory errors, and will want to adjust the Elastic and other memory variables in the env file and docker-compose file. Try and give it as much hardware resources as possible.
Once you create your VM in Hyper-V, Esx, VirtualBox etc, attach the downloaded ISO, boot the VM and configure the basics taking MOST of the defaults. The only thing I would recommend doing is setting a static IP of your choice in the network section when you get to that point (specifically ubuntu server flavor). You can use arrow keys and space bar to highlight and change settings from DHCP to Manual. I prefer a bare min Server install, not desktop, but if you are going to use desktop, set your static in Network Manager. You will also probably want to check the OpenSSH option on install (Ubuntu Server), as its much easier to SSH into the VM, than try and copy and paste these commands through either a Hyper-V or Vsphere console window imo. In the Desktop version, you will probably have to install manually. Issue the following command if you want SSH access "sudo apt install openssh-server".
NOTE: As stated above, use Putty for Windows, or the SSH terminal command to SSH into the VM at the static IP address you set to continue on from here. Putty requires just the defaults and the IP, where a linux terminal will require the command syntax of "ssh username@YOURSTATICIPADDRESS" you set in the prior steps.
Now that we have our base Linux Ubuntu 22.04 OS installed we are going to dive into the commands below to start the install process. This will include getting Docker and Portainer installed. Portainer makes docker management much easier imo, and is essential to the quick install technique in this guide.
PREP the VM for Docker/OpenCTI deployment
Update the repositories
sudo apt-get update
Install Prerequisites : (Some of these will already be installed most likely, just a second check to verify)
sudo apt-get install apt-transport-https
sudo apt-get install ca-certificates
sudo apt-get install curl
sudo apt-get install gnupg-agent
sudo apt-get install software-properties-common
Add the GPG Key
sudo curl -fsSL https://download.docker.com/linux/ubuntu/gpg | sudo apt-key add -
Add Repo
sudo add-apt-repository "deb [arch=amd64] https://download.docker.com/linux/ubuntu $(lsb_release -cs) stable"
Install Docker and Docker Compose
sudo apt-get update
sudo apt-get install docker-ce docker-ce-cli containerd.io docker-compose
Manage docker as a non-root user
sudo usermod -aG docker $USER
Logoff and back on to make docker user changes effective
Docker Swarm Initialization
docker swarm init --advertise-addr <YOURSTATICIP>
Install Portainer : The graphical GUI to manage Docker
sudo mkdir -p /opt/portainer && cd /opt/portainer
sudo curl -L https://downloads.portainer.io/portainer-agent-stack.yml -o portainer-agent-stack.yml
Change ports before starting up Portainer (Required to eliminate conflicts in ports)
sudo nano ./portainer-agent-stack.yml
Change ports from whats shown first to whats shown second
ports:
- "9000:9000"
- "8000:8000"
TO
ports:
- "NEWPORTOFYOURCHOICE:9000"
- "NEWPORTOFYOURCHOICE:8000
You can place a 2 or 1 in front of 9000 and 8000 respectively to make it easier. Just make note of these ports, as this will be how you access Web Admin Interface for Portainer.
Hit CTRL-X to exit, "Y" save changes, drop back to shell.
Start Portainer
sudo docker stack deploy --compose-file=portainer-agent-stack.yml portainer
Accessing Portainer WebUI
You can then login to Portainer by using the YOURSTATICIP:29000 or 19000 etc. and setting your initial credentials and password.
Configuring your Initial Portainer Stack using the custom docker-compose.yml file I am providing
Follow the link below to get the custom docker-compose.yml file downloaded. Its a simple text file, and we are going to copy and paste the entire contents into the Portainer stack configuration shortly.
Pre-Configured Docker-Compose.yml File GitHub Download Worldwide Access Link
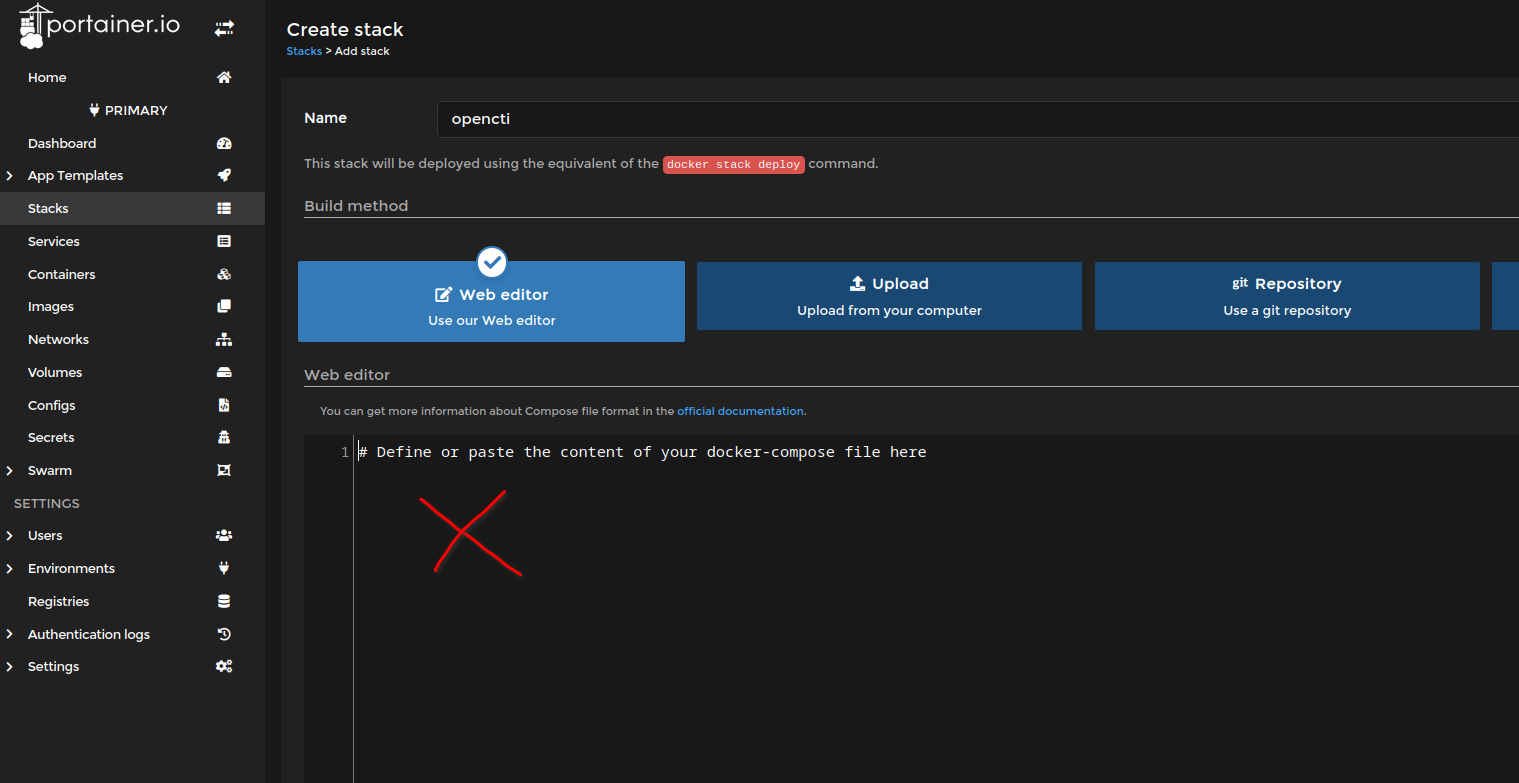
Once you copy the contents of the file, you will want to navigate in Portainer to HOME, Primary, Stacks, Add stack. In the top input box, type a name ie. OpenCTI, then in the web editor box below paste the entire contents of the Docker-Compose.yml file. In the screenshot below its where the Red X is. This is going to tell Docker how to configure all the containers and connectors I added on to the base example docker compose file from Github.
Now there are a few variables we need to change in the pasted compose text, which is minimal as I tried to configure as much as possible ahead of time. These are the API keys for the additional connectors, and the connector UUID's which are simply random generated UUID v4 variables. You can access a simple web UUID generator via the link below. This is to generate a fresh UUID and copy and paste one to each line that says "CONNECTOR_ID=randomUUID" the ones I have in there already should work fine, but its probably best you go and regenerate new ones and paste over the top starting after the "=". You can access the generator at : UUID Generator .
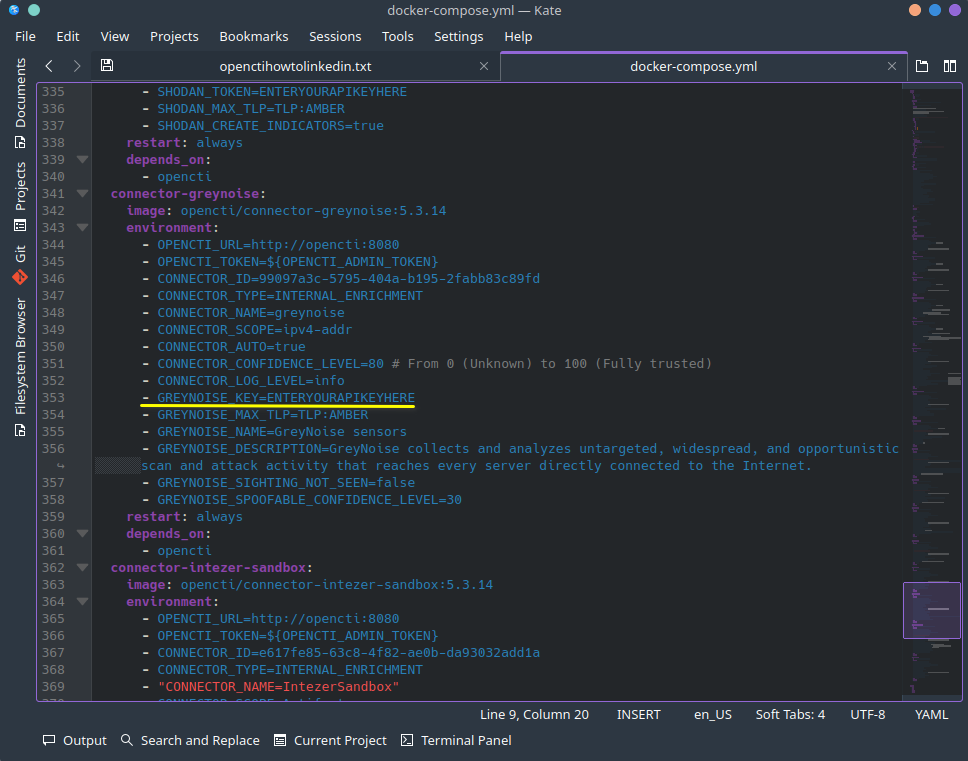
The next and last fields before moving onto the Environment Variables, is the API keys. See screenshot for where you need to enter the API keys you obtained in vendor signup in the beginning of this article. ie. Alienvault, Greynoise etc. I indicated this by the text "ENTERYOURAPIKEYHERE". Do this for each of the API Key line items located in each section looking for "connector-SERVICENAME:"
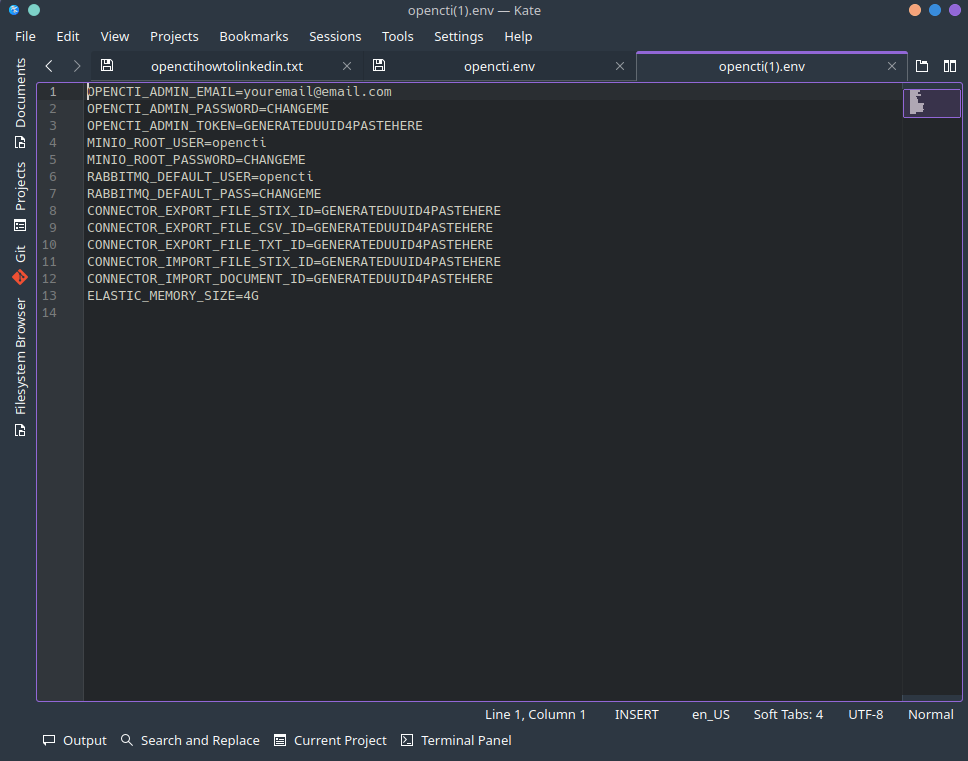
Once you fill in all the API keys, and substitute UUID's from the generator, its time to download and load the opencti.env file I provided below. Again, leaving the existing UUID's as is will work, but its recommended to substitute again using your own UUID's using the generator. Along with filling out your master OpenCTI web interface login username email, password etc. as seen in the screenshot below. Once that is done save the file as opencti.env, we will load the environment variables in Portainer last from the saved file. Download the base opencti.env template file here :
OpenCTI ENV File Github Worldwide Access Link
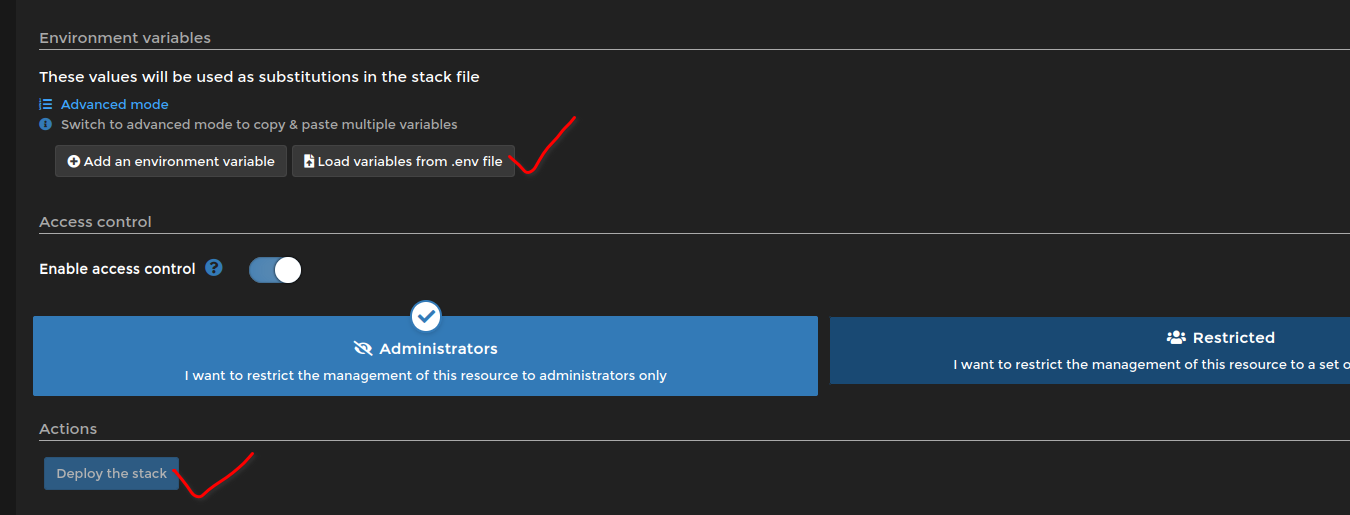
Now load the environment variable file you saved above after changing required fields as shown below. Then when done, click on "DEPLOY THE STACK".
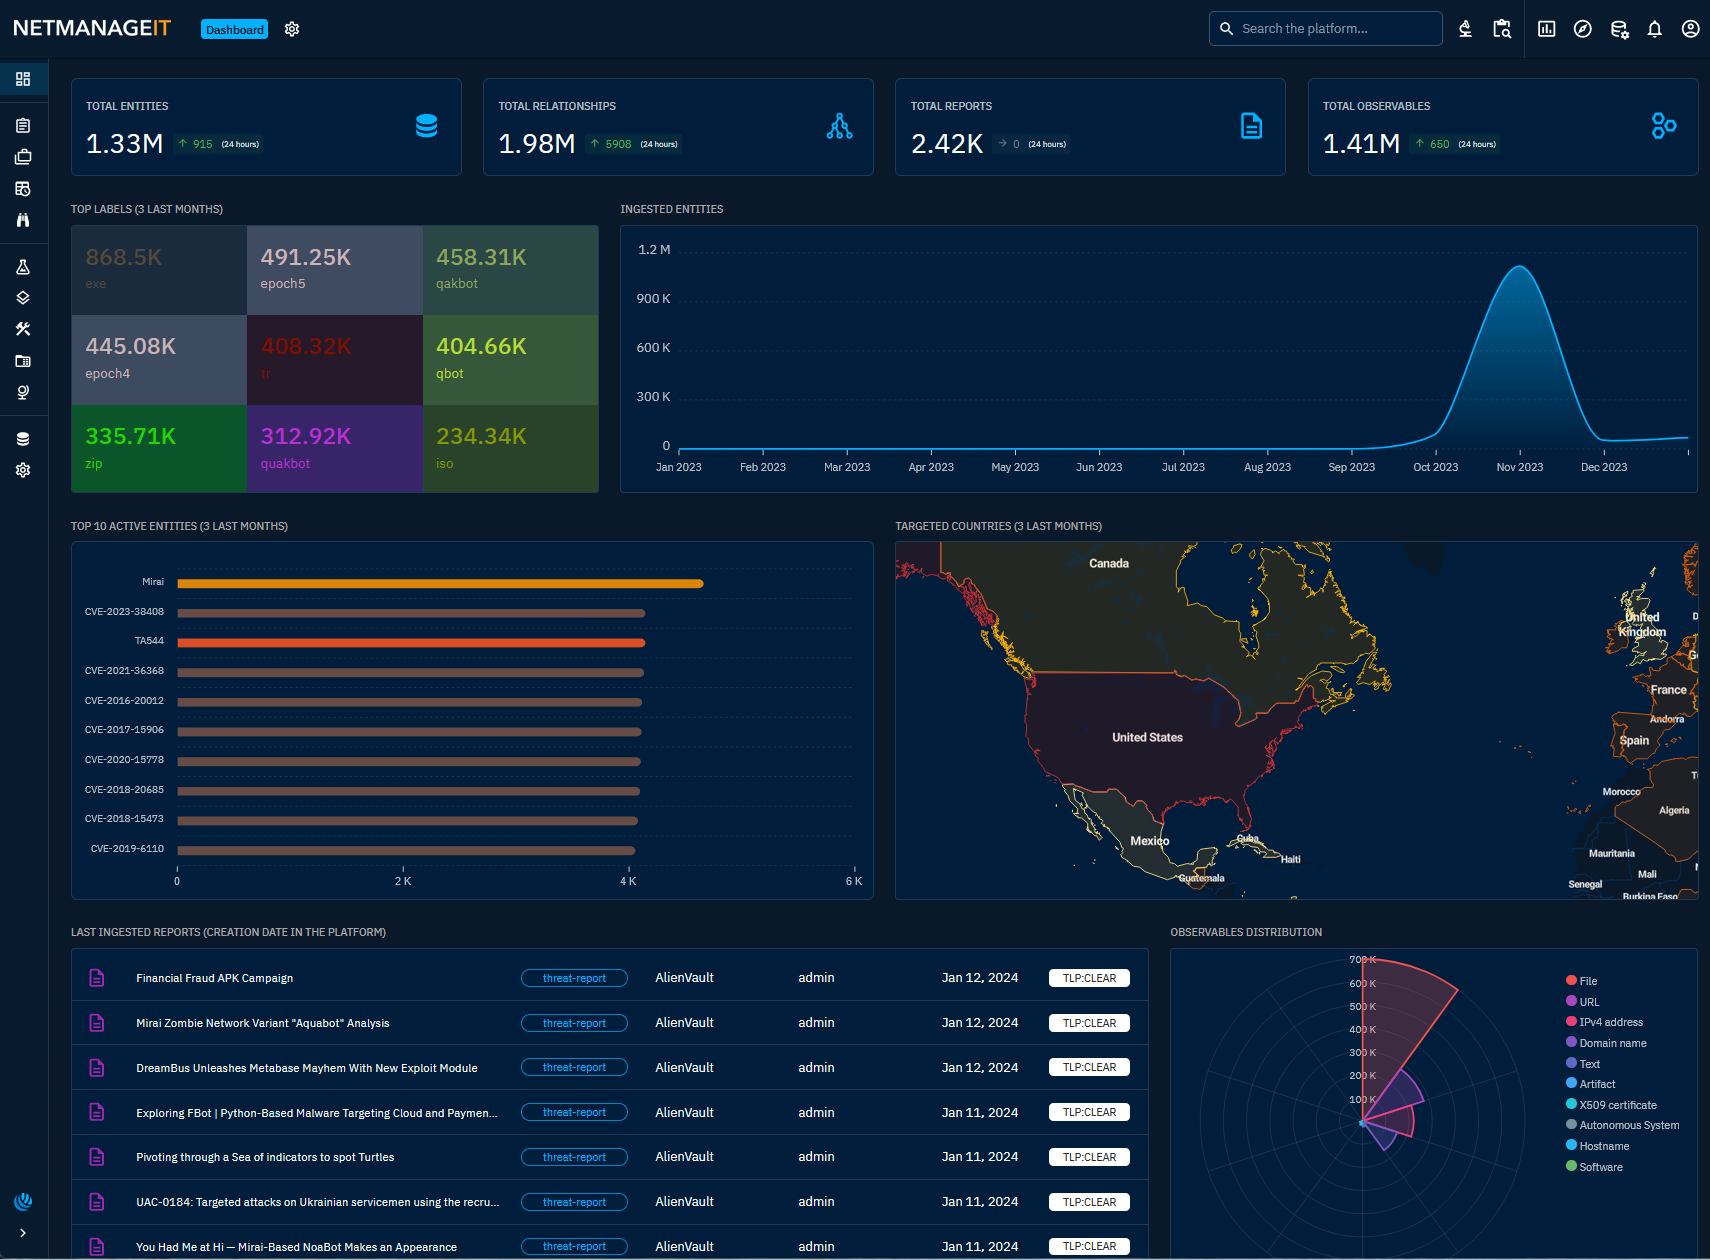
Now go get a cup of coffee and let everything spin up, its going to take some time depending on your hardware, and it will take time for all the connectors to reach out and fetch data. Give it 30 min and then go to the OpenCTI main web console at "http://YOURSTATICIP:CUSTOMPORT". Login with the username(email) and password you set in the .env file above and you should be good to go.
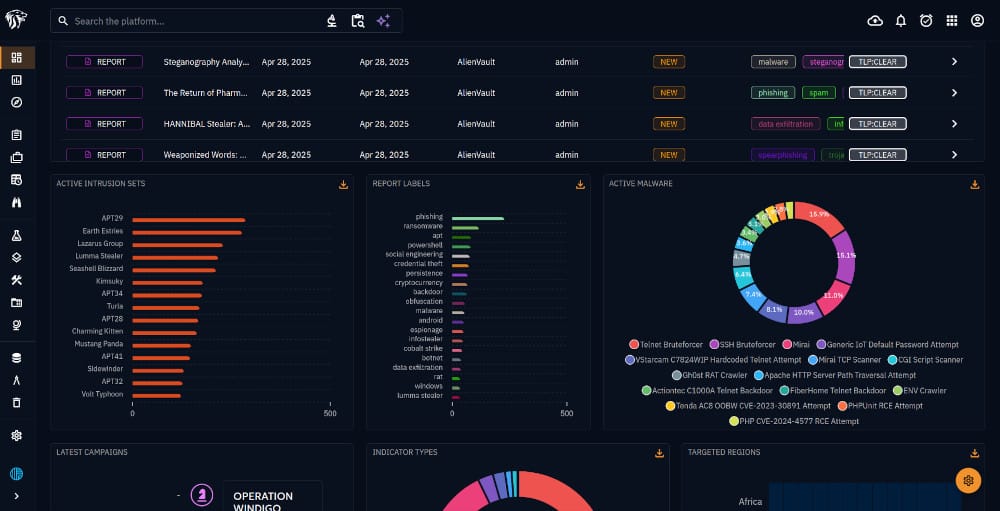
You should be greeted by this pretty dashboard with a wealth of threat information to dive into.

Portainer CE Upgrade - Optional
Depending on what Distro and method of install you used for Portainer, you may be on an older version. For example 2.11. If you want to properly upgrade to their newest release, in a swarm configuration, the method we used above. Then do the following.
docker pull portainer/portainer-ce:latest

docker service update --image portainer/portainer-ce:latest --publish-add 9443:9443 --force portainer_portainer
docker pull portainer/agent:latest
docker service update --image portainer/agent:latest --force portainer_agent UPDATE 10/26/23 - The newer latest versions of OpenCTI seem to have alot less memory issues, and consume less memory all things being equal!
That being said, OpenCTI uses NodeJS, and the default memory limit is set to 8096MB, you can change this for larger installs to 12000 or whatever if you have more resources to throw at it!
Docker-Compose Entry to change:
-NODE_OPTIONS=--max-old-space-size=8096
to: ie
-NODE_OPTIONS=--max-old-space-size=12000
Next entry to bump is the Elastic ENV variable,
In my example .env file it is set to 6G, you can change this to 8G, 12G etc.
ENV Entry to change:
ELASTIC_MEMORY_SIZE=6G
to: ie
ELASTIC_MEMORY_SIZE=12G
UPDATE 3/27/23 - Redis Server Out of Memory issues
Some of you may have noticed over time, depending on your VM memory available to the OpenCTI instance, you may see the following in your service logs for the Redis Server portion. This will cause events to stop being updated, or other weird behavior. Doing these 2 easy steps will help prevent out of memory issues, especially during high workloads.
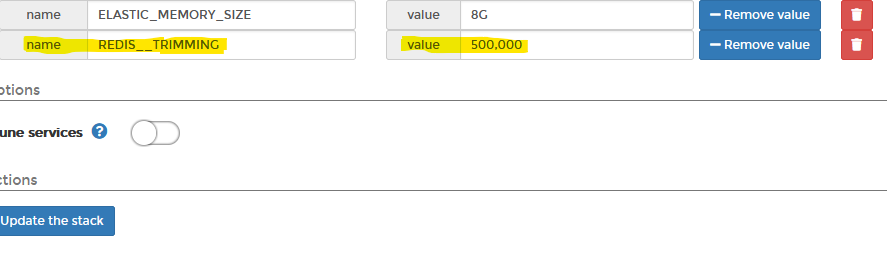
1st. Update the ENV variable by adding a new ENV variable called "REDIS__TRIMMING" , then for value chose "500,000" for medium deployments, and "1,000,000" for large tenants. I would recommend 500,000 for most people.
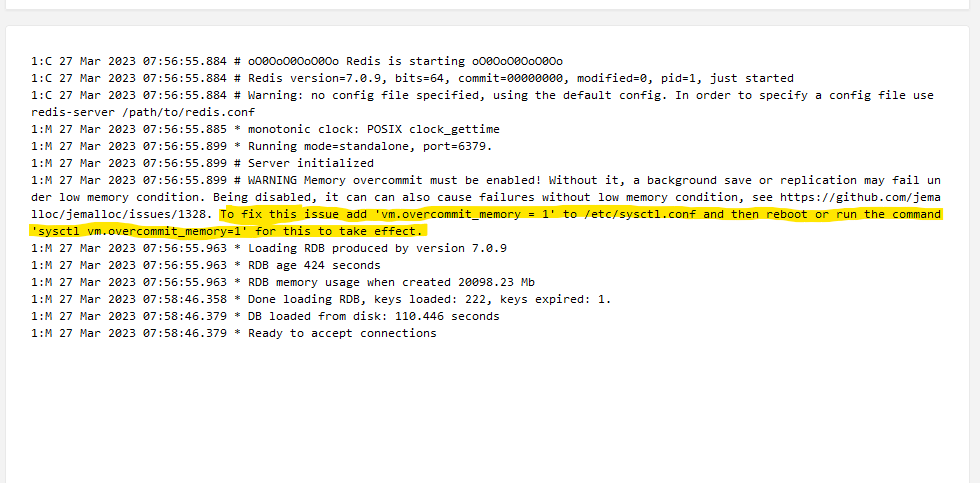
2nd. Run the command or edit your sys.conf file to allow vm overcommit memory option. See below, highlighted text is syntax/command to use.
You won't see this right away, but as you add more connectors pulling more data, and the database grows with more enrichment, the situation above will be most likely to occur. By doing these two additional tweaks right after install, you will perhaps save yourself some headaches.
I would also recommend you make a large swap file and turn it on. In my case, I have 32GB of physical RAM, so I made a 32GB of SWAP, this also helped out of memory issues.
To Create a Swap file issue the following commands, where 32GB in my example can be changed to the size you need in your installation.
Create Swap
sudo fallocate -l 32G /swapfile
Change Swap Permissions
sudo chmod 600 /swapfile
Mark Swap and activate
sudo mkswap /swapfile
sudo swapon /swapfile
Check to see if Swap is added and activated
sudo swapon -s
To make Swap file permanent issue command to modify /etc/fstab
echo '/swapfile none swap sw 0 0' | sudo tee -a /etc/fstab
Part 2 - Installing and setting up Certbot with LetsEncrypt free SSL with Nginx
Some prerequisites:
You deployed Opencti using the original article I posted using portainer.
You already set an A record for a domain to point to your IP in your domain DNS admin page. LetsEncrypt needs to verify proper name resolution before issuing your certificate.
Ports 80, 443, and Portainer port must be open in your firewall.
You will need to have access to Portainer to make the required changes, in my example using Digitalocean, I needed to open ports 80, 443, and 19000 to access portainer.
NOTE: You need to use your IP Address, not the domain name to properly access the Portainer UI, which is not being proxied with Nginx in this example. In my example I will use "https://SERVERIP:19000".
Important NOTE: At the time of writing this article, I did not set Portainer to use HTTPS, but you can, so I will be restricting port 19000 HTTP to only my WAN IP for additional security for the time being. Just to get the configuration done, and then close the port.
Also note, you will need to add an additional Docker-Compose Variable towards the end for it all to work and be compatible with using a reverse proxy like Nginx.
Install Certbot
sudo apt update
sudo apt install certbot python3-certbot-nginx
Create domain Ngix file in sites-available folder
nano /etc/nginx/sites-available/example.domain.com.conf
Important - Change server_name directive to the domain A record you created earlier, in my example that is opencti.netmanageit.com. See below.
I am including a link to the config below which you will need below for proper functionality due to OpenCTI using Websockets. You can access this file at the link below, just simply copy and paste the contents of this file into the file you just created above. Git Link
UPDATE 10/26/23 NOTE: /opencti location directive is deprecated I noticed it recently when testing it no longer works. You only have to have the / for location, and just your proxypass 8080 directive for everything to work. Removing from example below and GIT Example.
server {
listen 80 default_server;
listen [::]:80 default_server;
server_name opencti.netmanageit.com;
location / {
proxy_buffering off;
proxy_cache off;
proxy_http_version 1.1;
proxy_set_header Host $host;
proxy_set_header X-Real-IP $remote_addr;
proxy_set_header Upgrade $http_upgrade;
proxy_set_header Connection "upgrade";
chunked_transfer_encoding off;
proxy_pass http://127.0.0.1:8080;
}
}
Save the file CTRL+O, then CTRL+X
Create a symbolic link/enable the sites-available file you made above.
sudo ln -s /etc/nginx/sites-available/opencti.netmanageit.com.conf /etc/nginx/sites-enabled/
If a default nginx file exists in /etc/nginx/sites-enabled or /sites-available remove them with rm command.
rm /etc/nginx/sites-available/default
rm /etc/nginx/sites-enabled/default
I do this so certbot cannot get confused as to which Nginx file to modify.
Go ahead and Reload Nginx at this point
sudo systemctl reload nginx
Test nginx file using command "nginx -t" If all OK, continue on.
Start Certbot with Nginx Plugin
sudo certbot --nginx
Enter your email address for LetsEncrypt renewal notifications and general correspondence.
Hit Y to Agree to Terms
Hit Y or N to share info on your domain with Organization
Enter your Domain name which matches the nginx file you created earlier with the copy and pasted code from the Git Link. In my case its opencti.netmanageit.com
You should see a success message.
Go ahead and reload Nginx one more time for good measure, at this point two things happen.
DEPRECATED. DO NOT USE /opencti Directive, it no longer works. Leaving as older versions do seem to need it.
Notice the /opencti addition, you may have noticed this directive in the Nginx Example file, and you will also see it below.
Modify the existing Docker Compose file in Portainer by going to Edit Stack and add the following variable "- APP__BASE_PATH=/opencti"
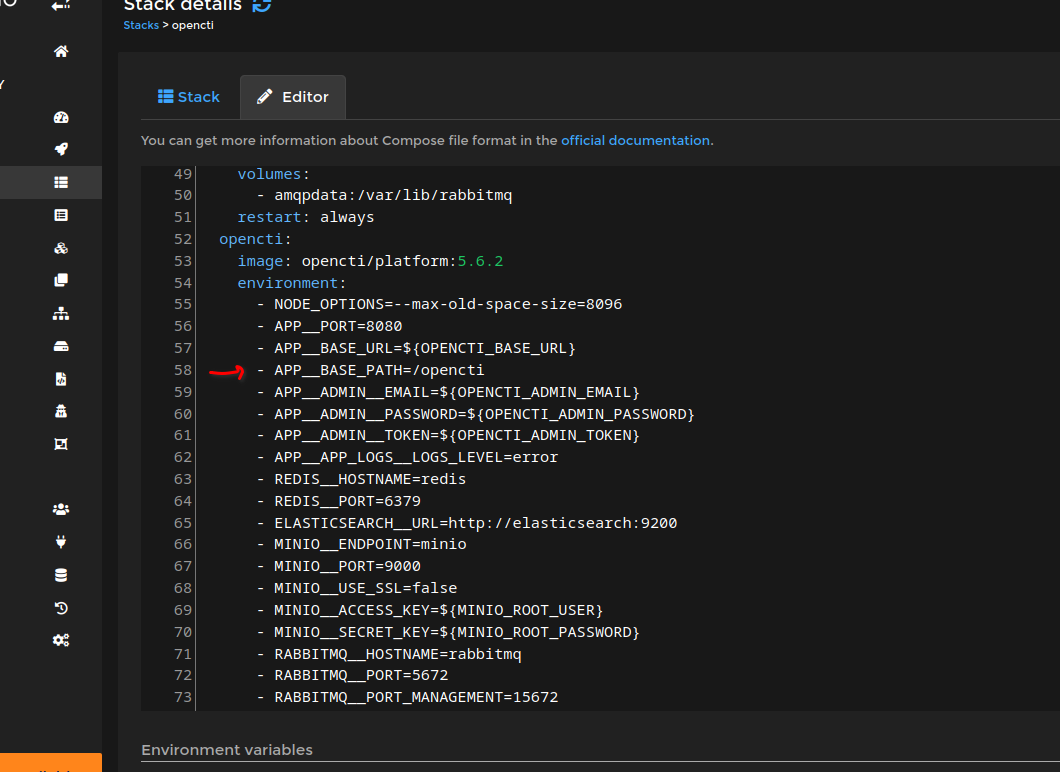
Once you add the variable above, which is NOT included by default in my original docker-compose base example, hit "Update Stack".
At this point you should be able to reach opencti using a free LetsEncrypt SSL Cert.
Remember, Ports 80 and 443 have to be open on your cloud firewall, local firewall etc. for proper renewal of LetsEncrypt certs every 60-90 days.
Set an automated process to ensure LetsEncrypt can renew automatically.
Enter command "crontab -e"
Add the following to bottom of file below the Remarks
0 22 * * * /usr/bin/certbot renew --quiet
In this example it will check daily at 10pm and if the Cert falls within the less than 30 day expiration window, it will automatically renew.
If you want to not do this last step, and wait for an email reminder that your SSL cert is close to expiring and manually renew, that command is simply "sudo certbot renew".
That's it! If you notice any issues or problems, let me know.
Dan