
Nikto Web Vulnerability Scanner

Nikto, what is it? Its one of my favorite CLI driven Web Vulnerability scanners to check thousands of best practice setup variables and vulnerabilities. It is used to proactively check and give insights on what you need to change to secure that website to the highest level you can.
While I regularly use and recommend other tools similar to Nikto, such as Owasp ZAP (Zed Attack Proxy), OpenVAS (Greenbone Security Scanner), Burpsuite etc. I keep coming back to using Nikto first and foremost, as its lean, fast, and has a small footprint. It also gives a great 30,000 ft view of where things stand and gets right to the point letting you know and warning you of potential security issues with your setup.
Installing and using Nikto:
Installing and using Nikto is incredibly easy, and one of the quickest and easiest way to do this is to do the following.
Git Clone the program from Git:
git clone https://github.com/sullo/nikto
Change into the main program directory where the main script is located:
cd nikto/program
Checkout the 2.5.0 Branch
git checkout nikto-2.5.0
Run Nikto with a simple command to get started:
./nikto.pl -h https://your.domain.com
If there is an error, you may need perl installed, quickly check with:
sudo apt install perl
Now we are going to show a quick real world example using one of my self hosted sites. I will run the main command against our SpeedTest site and review the results. A typical scan can take 10-30min, but the tool will return some immediate results of obvious misconfigurations. So in the interest of time I cancelled the script running in this example for sake of time.
Initial Scan results:
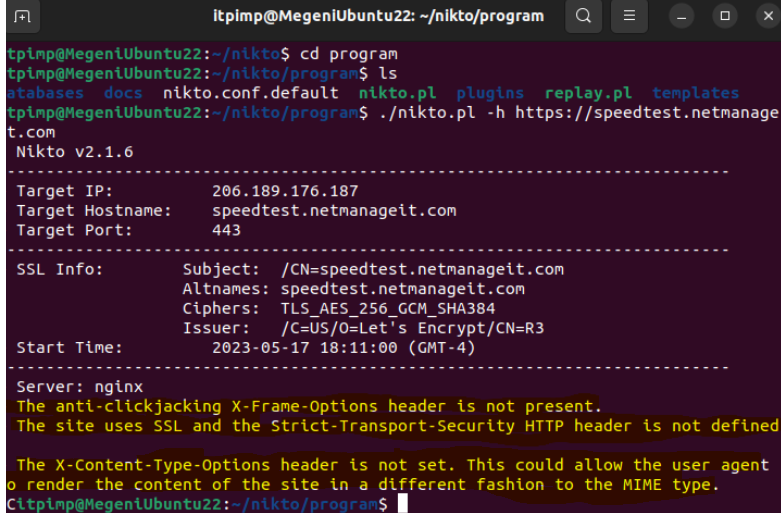
Here we can see three things off the bat I highlighted in yellow. The anti-clickjacking X-Frame option header error, the lack of Strict Transport Security Header, and X-Content Type Options Header error. Since I am a heavy user of Nginx is my Reverse Proxy of choice, I took the liberty to comment out the nginx.conf / sites-available code lines to show a before and after fix scan results comparison in this example. As I have already went through this site and made multiple changes.
So in my case, being a lover of NGINX, we need to go add a few things to either your general Nginx.conf file or site specific conf file in your sites-available directory respectively. These are located in /etc/nginx and /etc/nginx/sites-available folders. Below you will see the lines we need to add. For the first item clickjacking X-Frame, we add:
add_header X-Frame-Options "SAMEORIGIN";
For the second item of concern, the SSL Strict-Transport-Security header we will add the following right below the above line:
add_header Strict-Transport-Security "max-age=31536000; includeSubDomains" always;
For the third item of concern, the X-Content Header:
add_header X-Content-Type-Options nosniff;
Note: depending on what your using for a Reverse proxy, or if using Apache directly, you can add these options in a couple different places. A simple good search of the said error within Nikto combined with the platform your using, should produce an easy fix with instructions.
After making the changes, we need to quickly restart Nginx for the changes to take effect with a simple "systemctl restart nginx" command. Now we will rescan with nikto, and notice the 3 initial standout errors in the beginning of the scan are gone.
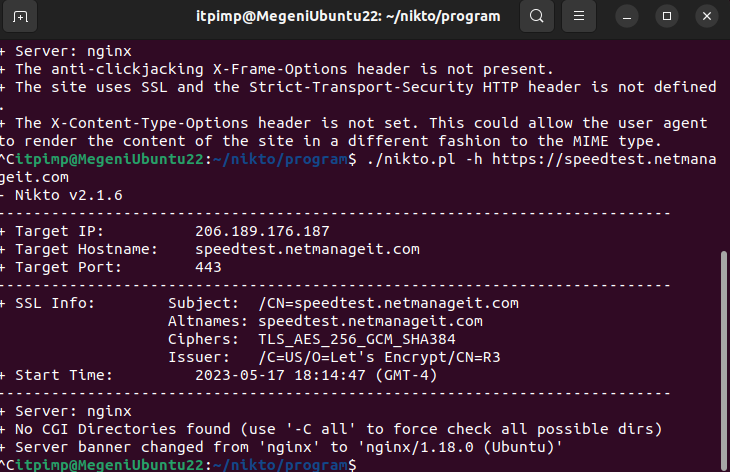
There you have it, one of the quickest and comprehensive web vulnerability scanners to check for common misconfigurations and security weaknesses! I always run multiple tools in succession to get a very good idea of what I need to do to secure the site in question as much as possible. Many I listed in the beginning of the article.
As always, if you like these articles, please like and share!