
MSP and Business Automation with N8N platform

What is n8n? n8n is an open-source, node-based automation platform that allows users to automate complex workflows quickly and easily. With n8n, you can create custom workflows using visual methods, (think visio), connecting different services and triggering actions based on specific events. It is similar to Zapier and other Cloud based automation platforms, but N8N can be self-hosted for free!
In essence, n8n is designed to automate repetitive tasks, freeing up your time and energy for other important things. Best of all, you don't need to be a developer to use n8n - its visual interface makes automation accessible to everybody, regardless of technical expertise.
N8n offers a wide range of features to help users build complex workflows with ease. Some of its most useful features include:
- A user-friendly visual interface that requires no coding
- Support for over 200 different services, including popular tools like Trello, Gmail, OpenAI, Outlook 365, Shopify, PSA platforms like HaloPSA and Syncro, and so many more!
- The ability to trigger workflows based on specific events, such as the receipt of a new email or the creation of a new task in Trello
- Support for custom JavaScript code, allowing for even more advanced automation
- Detailed logs and error-handling capabilities to help you troubleshoot your workflows
By using n8n, you can automate many time-consuming tasks, such as lead generation, data entry, and social media posting. Some benefits of n8n include:
- Increased efficiency: By automating repetitive tasks, you can free up your time for more important work
- Cost savings: You no longer need to pay employees to complete tedious tasks, saving you money in the long run
- Improved accuracy: Automation reduces the likelihood of human error, ensuring that your workflows run smoothly and efficiently
- Better insights: n8n provides detailed logs of each step in your workflow, allowing you to fine-tune it for maximum effectiveness
Below I will show you a super easy way to install N8N on Ubuntu 20.04/22.04 either hosted on prem or on a VPS provider, the instructions are the same. The beneifits of N8N is its unlimited usage, where Zapier charges by the number of task's run, and you then will have to upgrade your plan to get more tasks and ZAP's as they call it, those are individual workflows, as we will call them in N8N.
For a complete list of N8N native app connectors, you can go here to browse them all. https://n8n.io/integrations/
Pre Install:
Some pre-requisites before install. A Linux VM server prepped and updated with docker and docker compose installed. N8N is a fairly hungry platform for resources, so I would start with at least 2 cpu's and 4GB ram as a minimum. Once you get moving and creating more and more workflows and automations, you will likely have to monitor resource utilization and reallocate more resources naturally. You will want to create an DNS A record that will point to your N8N instance, as you will see where to modify the Caddy config file to match. The install instructions contain the full N8N platform, and a caddy container to automatically handle registering and renewing your SSL certificate.
NOTE: While you can setup N8N without SSL, its highly recommended for production and most use cases. This is because you will be using many webhooks and API level communications to and from many different software platforms, and many of them will and should require secure communications to and from N8N.
Ok, onward to installation:
Git Clone the repo
git clone https://github.com/n8n-io/n8n-docker-caddy.gitChange Dir into the repo you just cloned
cd n8n-docker-caddyTo have Caddy be persistent on reboot create Caddy volume
docker volume create caddy_dataThe Default settings in Docker-compose file should be ok, but if you want to look and make necessary changes ie port open and review.
nano docker-compose.ymlThis part is critical for proper SSL functionality with Caddy. You must modify the Caddyfile.
nano caddy_config/CaddyfileYou will see the domain area at the top, you need to change this to your FQDN you made your DNS A record for.
n8n.<domain>.<suffix> {
    reverse_proxy n8n:5678 {
      flush_interval -1
    }
}
One last step before starting it all up, edit the .env file in the root folder
nano .envYou need to set your default username and password to secure N8N, your domain info, email for SSL cert notifications and your time zone. Once done, save the file and we are ready!
Now lets start it all up and let Caddy automatically fetch and setup SSL.
docker compose up -dGive it a few min, as it will take a bit to initialize, but if all goes well you can access your N8N via SSL at n8n.domain.com.
Security Note: Its best practice especially if using your N8N server in a production manner to only allow IP address's of other cloud platform servers/services via whitelisting. Almost all SaaS cloud platforms, usually hosted on AWS, will list their IP block, or IP address's their API servers are using. No need to expose your server to the world if you can help it. N8N is great about regular updates and security patches, but you don't need malicious actors monkeying around trying to exploit things. :)
Using the Platform:
N8N is a powerful platform, with many integrations, so I won't be doing a deep dive on how to setup each connector. That being said, N8N makes its built in help of configuring an account/API with clickable links to learn how in each stage of the game. Often times, you will be setting up an API key in a platform, and plugging that information into N8N accounts to be saved and used in your workflow.
The great part of N8N, and what I love the most about it, is the visual "MS Visio like" layout in terms of dragging and dropping different functions/integrations onto the workflow workspace, and connecting them in any order you want. I love Zapier, I still use it for certain things, but this is something I like better about N8N than I do Zapier, its a really slick design!
Once you start with a blank workspace, you can click on the + to add the first step in your workflow, and let N8N guide you. I am going to show you two examples of workflows I made, and each starts the process with a different "trigger". These two are often the most common types of triggers, a schedule and a webhook trigger.
On a schedule, you configure the first step to run every X number of seconds, min, hours etc. Which then starts the entire chain and workflow execution to be run. The second is also very common, it is to setup a Webhook to listen to a POST request from another platforms outgoing webhook integration. In my workflows, I often use Rocketchat's Outgoing webhook integrations to trigger the workflow on N8N via a "trigger word" in a channel/room within Rocketchat. This trigger word causes Rocketchat to execute the outgoing webhook integration with the message data, which posts to the listening Webhook in N8N to start the workflow.
First Example:
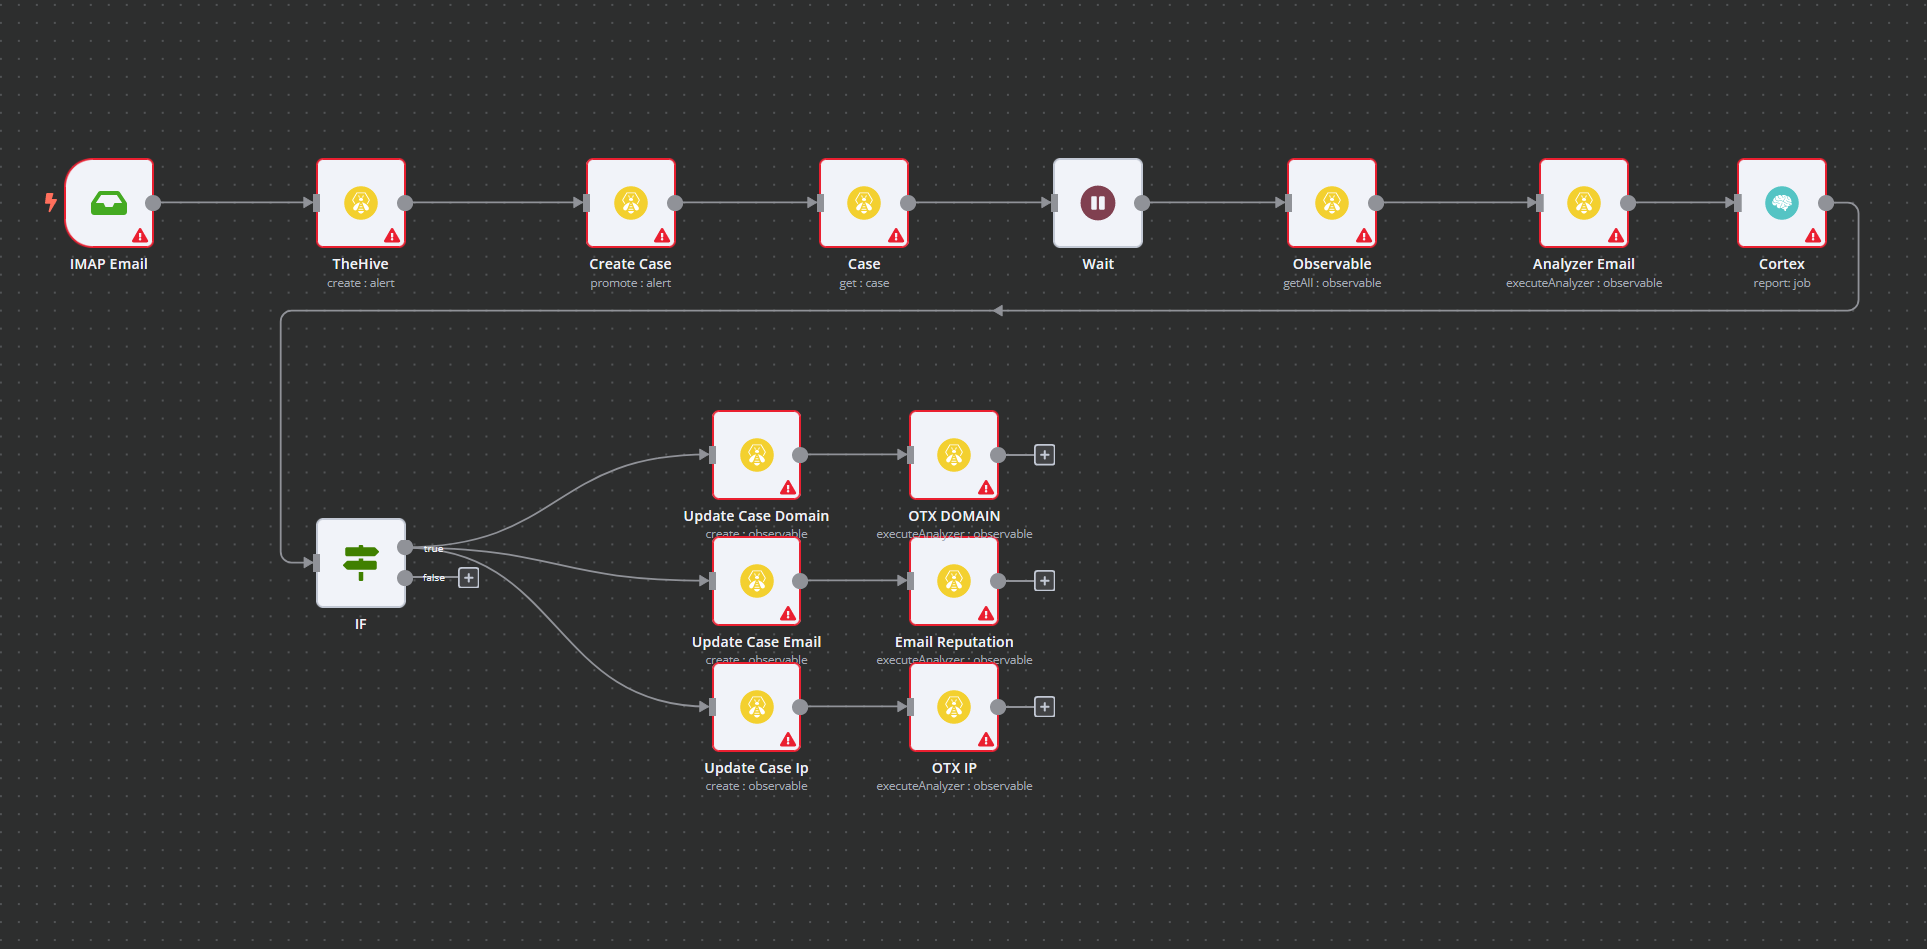
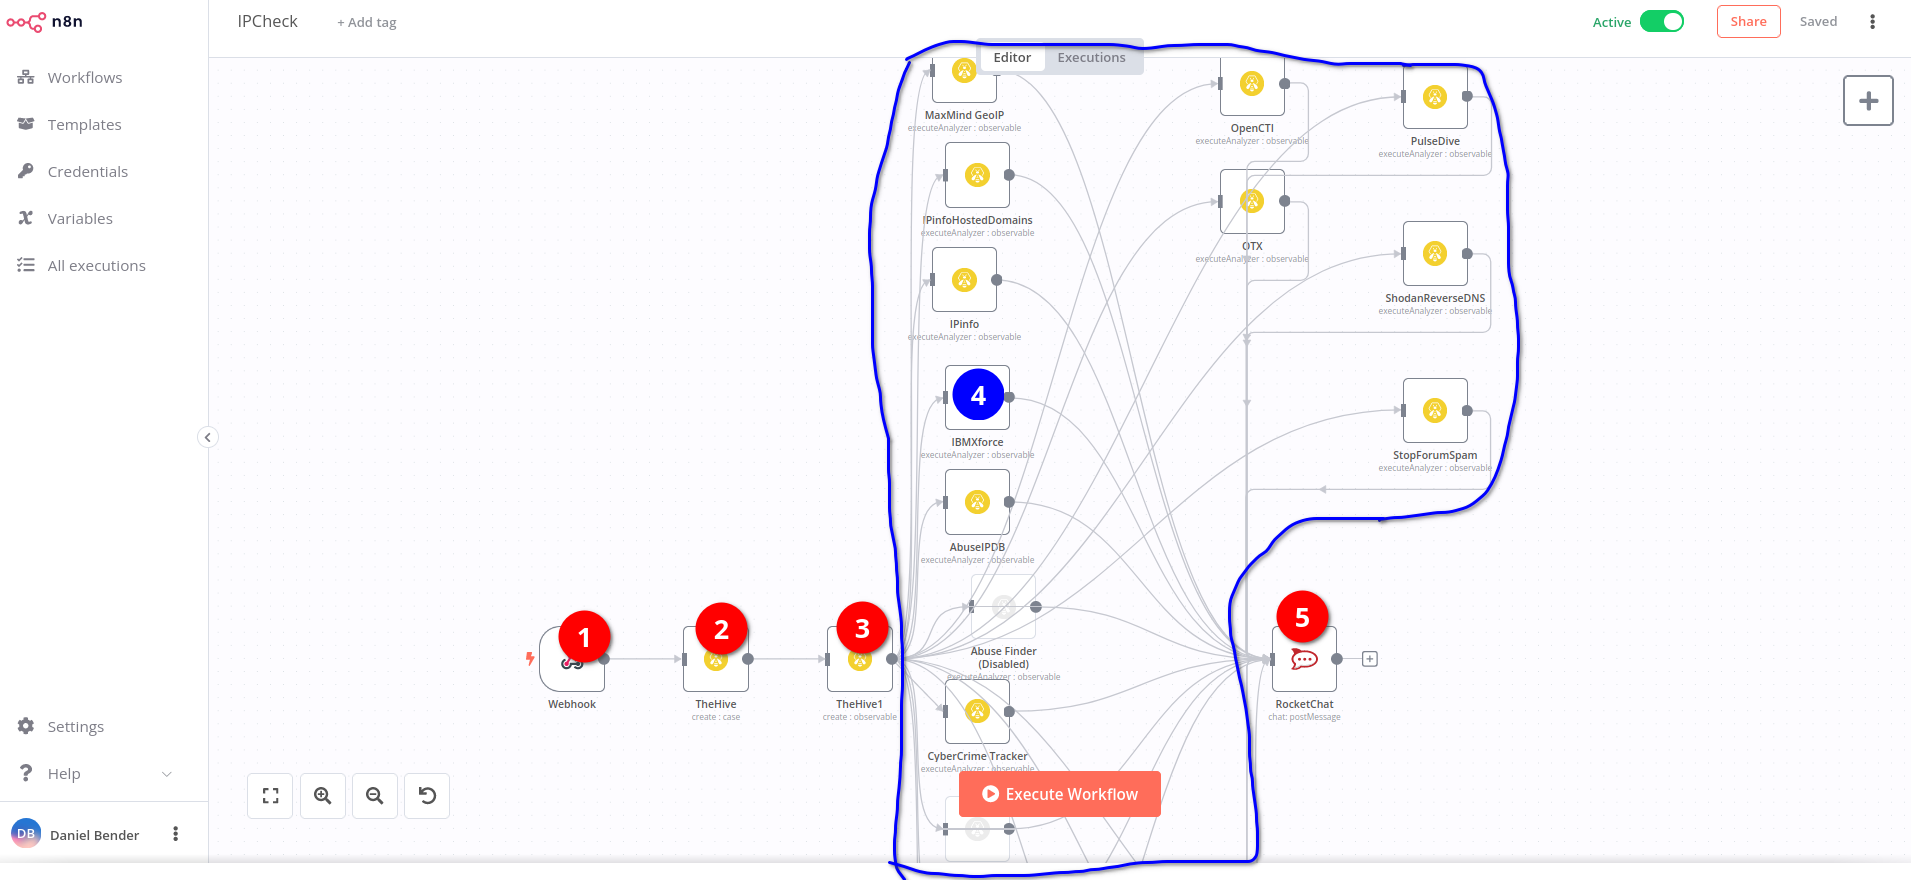
I built a Rocketchat integration so when an IP or Domain observable is posted to a particular Rocketchat channel, N8N receives this request through a webhook trigger and runs through the workflow from start to finish. You can click on each step to configure that step, and its as easy as dragging data fetched from the previous step in JSON or table value to the configure dialog box.
Here is the order of basic steps.
Webhook receives IP or Domain >
The Hive integration via API creates a Case >
The Hive creates an Observable under that Case >
The Hive calls cortex analyzers I setup and analyzes IP or Domain >
Results of The Hive analyzers run are then fed to the final Rocketchat node>
This posts the cumulative results of each analyzers run from the Hive via Cortex in a formatted Rocketchat channel post. Pretty cool huh? The circled blue 4th step, each of those hive icons runs a different analyzer and they ALL Run till completion before executing final step 5.
NOTE: There is a lot more to getting this to work on each level than it appears on the surface, but I am going to keep this article more surface level, and much can be easily figured out by playing with the tool. Which I find really intuitive.
Second Example:
In this example, I create a self help email auto-responder that uses OpenAI's API to complete/respond back to the same sender email address where the Lvl1 support question came from. The total time from start to complete is around 20 seconds in duration.
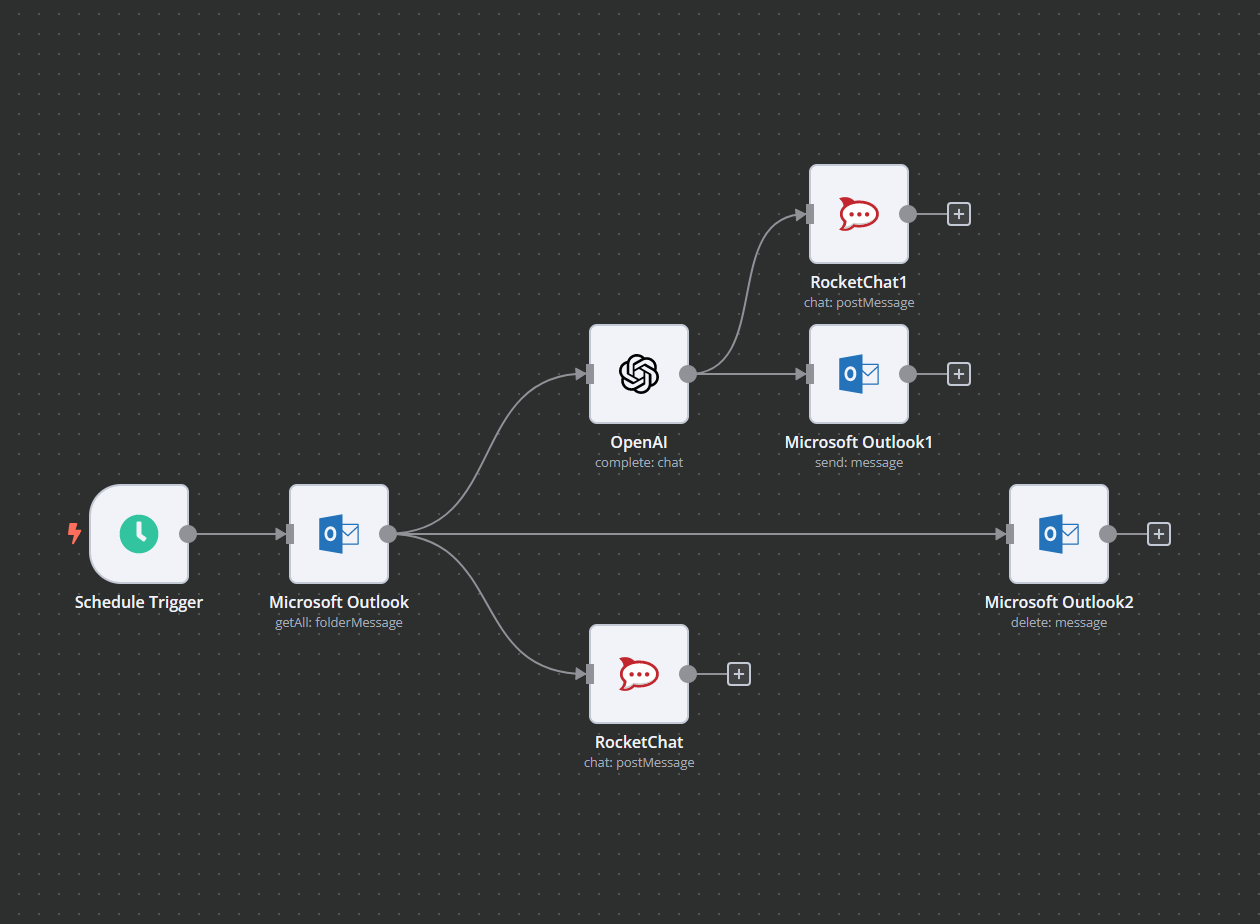
Going to try and sum up this workflow the best I can. Here it goes.
So the flow starts by a trigger on a schedule, which checks every 5 seconds a dedicated 365 email mailbox. This is done through an azure Oauth app setup within N8N so it can talk directly to the 365 mailbox on the API level, not an inferior IMAP type setup.
You can see the second box from the left , Microsoft Outlook with the 365 Oauth setup gets all messages with a limit of 1 message per run every 5 seconds. It then forks the email question to Rocketchat channel via API hook for our records. And also goes to the OpenAI API setup. This is where the body of email is extracted, source address etc, and forwarded to the OpenAI API. When that completes it forks the Davinci language model response back to Rocketchat channel, and also sends the OpenAI response text into an email template I setup using the same 365 Oauth API integration with N8N. N8N knows who to send it to, as it is set to extract the source originating email earlier back in the chain.
Now you can see the straight long line that goes from the first outlook box all the way to the right. This is so it finally can delete the originating email that got delivered to our dedicated email mailbox, and this is done by extracting the original 365 message ID, unique to every email. That way if there is more than one email that gets delivered at exactly the same time, it only pulls the latest newest email and limits 1 in the GETALL command. This way it ensures every message gets processed and deletes only one at a time, and only the email it has processed, again based on the message ID field extraction. The subsequent next 5 second run will work on the remaining 1 or 2 emails for example causing an ever slight delay.
Without this key logic sequence, messages would build up and the entire process would break down causing unpredictable results. Lastly, simple 365 domain whitelists are put in place to only allow delivery of the email if it matches an approved customer email domain. Bout sums it up! hope this helps.
So in summary, a user can ask basic LVL1 type questions via email, and get a response back in 15-20 seconds delivered right to their inbox.
I cranked this article out pretty fast, so I probably will be coming back to add more detail and tweak some stuff. If you have any questions, let me know!
Dan